Launch Your WordPress Website for Just $1 — Limited deals available. Don’t miss out!


Control Panel Documentation
If you need further assistance you can reach out to our tech support anytime!

Web Control Panel
To access the control panel, you must first login to the customer portal and then navigate to Services > Manage Service > Login to control panel

Websites
Installation
1. Navigate to the ‘Websites’ option in the side menu
2. Select either the Production or Staging website environment
3. Start from scratch or use install the WordPress application
4. Enter your domain name (e.g., example.com.au) to connect it to your website
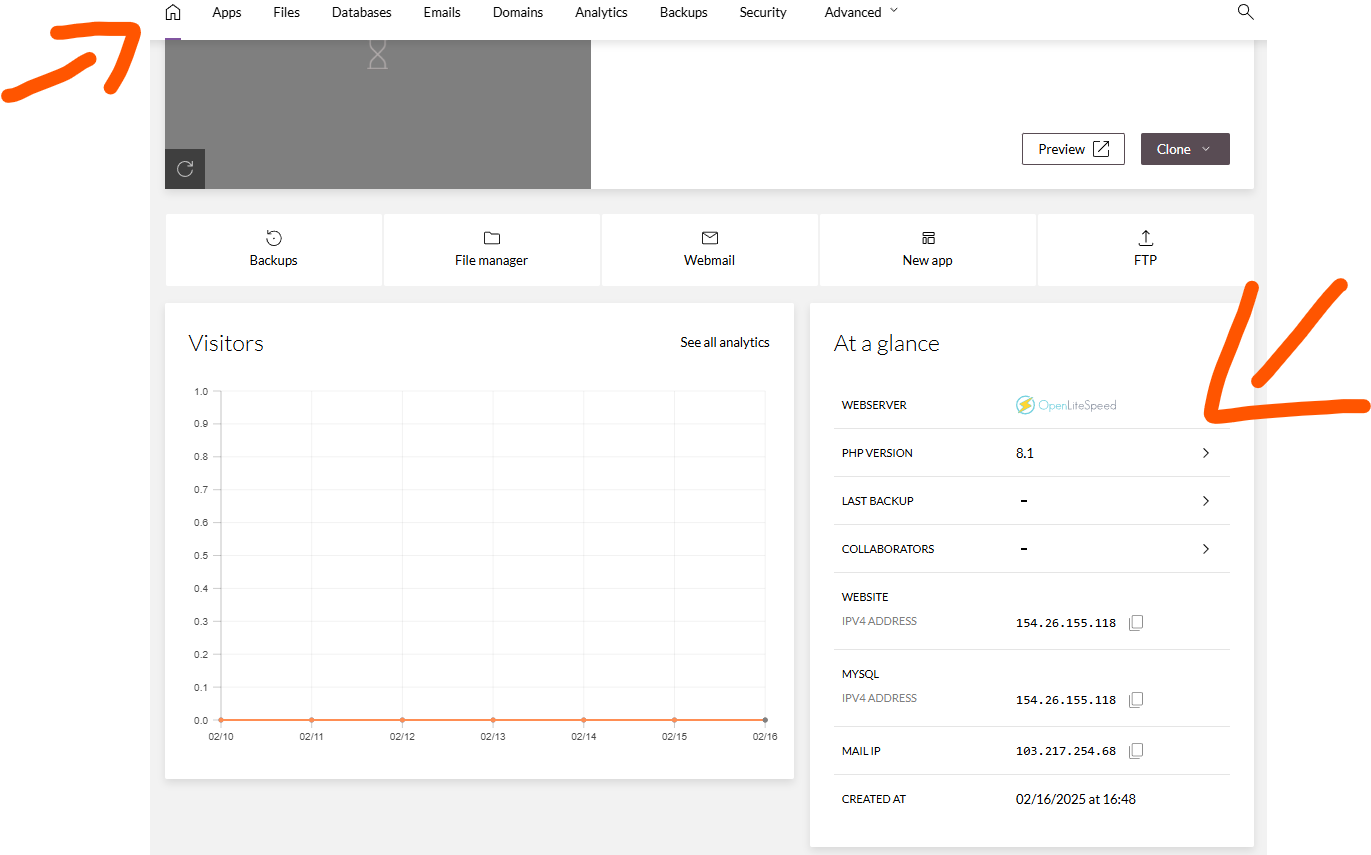
When a website is created, you will be able to access the full suite of hosting tools—including the file manager, databases, domains, and emails—by clicking on the website in your "Websites" tab from the side menu.
See the video for instructions
Installation
1. Install App (We only offer WordPress for the time being)
2. Fill in the credentials
3. Click the install button
2. Fill in the credentials
3. Click the install button
See the video for instructions
Management
You can click on the 'Manage' button on any website in your Apps list. This will bring up a menu with options to login to your WordPress dashboard and more.
You can access the full suite of hosting tools by clicking on the specific website in the 'Websites' tab.
See the video for instructions
For the Domains tab and DNS zone to appear, you first need to create a website, as explained above.
You can go to the 'Domains' tab in the control panel to manage the DNS records.
If are using a domain provider other than Web Host Wizards, you can either
- Change the domain nameservers to
ns1.webhostwizards.net.au
ns2.webhostwizards.net.au
or
- Find the IP address details in the home tab of your respective website. From there you can point the required records to the respective IP address.
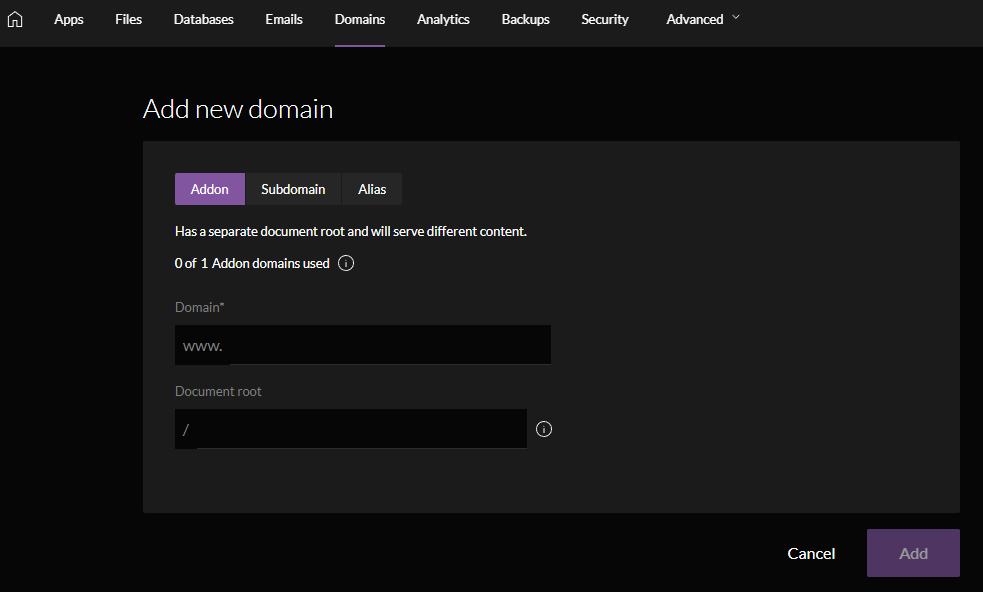
- Go to the 'Domains' tab in the control panel
- Click the 'Add Domain' button (on the far right side)
- Here you can choose either, Addon, Subdomain or Alias domain creation.
Information
The file manager contains all website files and folders
Creating a database
1. Navigate to Websites > Database
2. Create a new database
Database Management
In this panel you can access PHPMyAdmin and also manage your database, including managing users and uploading/downloading your website database.
Information
Here you can view Bandwidth and Visitor numbers.
Note
This is currently in Beta and may not reflect 100% accurate measurements.
Information
Retaining backups are done nightly on all websites and kept in cloud storage for 30days. You can restore any backup from within the last 30 days.
Restore Backups
To restore a backup, select any backup listed and then click the 'restore' button on the right side of screen. This will give you a choice to restore the website/email or both.
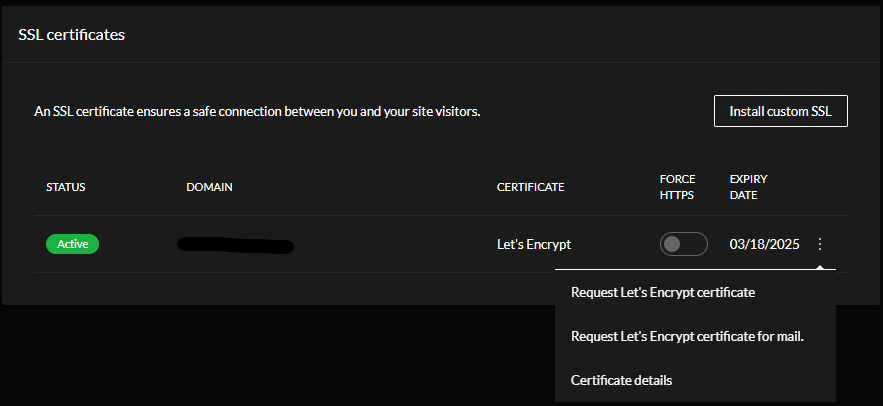
Here you can request a free SSL from let's encrypt for your website/mail domains.
Redirects
You can setup 301/302 redirects
Optimization
This gives you the option to Enable/Disable 'Opcode caching'. We recommend keeping this enabled.
FTP
Here you create/manage your FTP accounts. When an account is created you will be able to manage user directory access and passwords.
Developer Tools
Here you can manage your PHP configuration, create cronjobs and enable redis.

Emails
Note: Our main service is WordPress hosting
The email service is free, included with your hosting plan.
While it's fully functional for sending and receiving, it doesn't have the same infrastructure or delivery speed guarantees as enterprise grade platforms like Google Workspace.
Some delays or limitations (like POP/IMAP refresh times or occasional delivery lags) can occur. For mission critical email, services like Google Workspace and Microsoft 365 are built specifically for high speed, high reliability delivery.
1. Navigate to the 'Email' menu in the sidebar or topbar navigation
2. Click on 'Add Account'
3. Create the email address
4. Enter the mailbox type (Mailbox or Forwarder)
5. Enter the name for the sender and password
6. Click the 'add' button in the bottom right corner
When you create a new website in the control panel all required DNS records for mail are added automatically.
If you're using an external DNS provider (such as Cloudflare), you'll need to manually add the required DNS records to your DNS zone to ensure mail services work correctly. You can find these records in the control panel for your respective website.
Mail A Record
Hostname: mail.yourdomain.com.au
Value: [Enter IP address found in the control panel]
MX Record
Hostname: @ or yourdomain.com.au
Value: mail.yourdomain.com.au
Priority: 0
SPF
Hostname: @ or yourdomain.com.au
Value: v=spf1 include:mxroute.com -all
DMARC
Hostname: _dmarc
Value: v=DMARC1; p=quarantine;
You can enable DKIM in the Domain section of your website’s control panel. Once activated, the required DKIM records will be displayed.
If your domain is using Web Host Wizards' nameservers, simply enabling DKIM is all that's needed — the records will be added automatically.
If you're using an external DNS provider, you'll need to manually copy the DKIM records from the panel and add them to your external DNS zone.
You can find the link to Web Host Wizards webmail in the 'Emails' tab. Websites > Your Website > Emails.
Alternatively you can go directly to - magicmail.webhostwizards.net.au and sign in with your email/password.
You can find IMAP/POP3 details by navigating to Emails > Your Email > Email Client Settings at the very bottom of the screen.
To receive mail in your 3rd party mail client you can use port 993 or 995
To send mail through your 3rd party mail client you can use port 587 or 465
--
*Please note that our support for 3rd party mail clients is limited. If the emails are working through our webmail instance at Web Host Wizards without issue, then it is most likely an error with the specific mail client or incorrect connection details. Need help?
Web Host Wizards' support for email is limited. We utilize MXroute as our email partner. All emails pass through MXroute filters when sending and receiving mail. For third-party mail client connections, such as Gmail and Outlook, we can assist with all records. However, there is little we can do if all records are correct and mail is not sending to certain domains/email accounts or if the mail software is rejecting our inputs and server connection.

Website Importer
Note
Import
1. Navigate to 'Websites' in the side menu and click on the 'Import website' link.
2. Choose the control panel your are importing from, either cPanel or Plesk.
3. Follow the instructions and upload your backup
4. Review the import and confirm the details
When the import is complete, you will be able to see your website in the 'Websites' menu tab.

Logs
This displays the server logs for websites and backups

Packges
This displays your current subscription package and stats including disk space, bandwidth etc.
You can upgrade/downgrade your package here by clicking on the 'Buy Package' button in the top right of screen.
You can upgrade/downgrade your package here by clicking on the 'Buy Package' button in the top right of screen.

Users
Here you can invite users to join your control panel to manage websites.

Integrations
Important: Connecting the control panel to your Cloudflare account will override your existing Cloudflare DNS records and make the control panel the primary DNS zone.
Before connecting, please ensure that all current DNS records from your Cloudflare account are added to the control panel’s DNS zone to avoid service disruption.
More Information Coming Soon
You can follow the prompts to connect your Slack account here. From there all logs related to websites, backups etc will be sent to your connected Slack channel.
We are constantly updating our docs, if you require assistance please don't hesitate to reach out!
